Category Archives: Frugality

Cheap (or free!) summer activities for kids

swingingOh, summer. I have made no secret about the fact that it’s not my personal favorite time of year. Southern Indiana turns into a swamp in July. But I am determined to make the most of summer this year, so I’ve spent some time compiling a list of activities to fill up our schedule without draining my wallet.

Here are some of the ways we’ll be keeping busy this summer:

Discounted or free kids’ movies

Judah has never been to a theater. He really wasn’t ready to sit for that long before his brother was born, and I wasn’t about to take a newborn to a movie theater even for a matinee. Many theater chains are offering second-run morning movies during the weekdays in the summer, and it seems like a perfect opportunity to introduce a preschooler to the movie theater. At a buck or two per ticket, the risk of leaving in the middle of the movie with a restless kid isn’t so intimidating. Check with your local theater, but here are some nationwide programs:

Kids Bowl Free

Sign up to get two free bowling games per kid, per day all summer long at select bowling centers with this program. Age ranges vary, but some go up to 15 years old. You’ll still have to pay for shoe rental and adult games. Find a participating bowling center in your area and get more information at Kids Bowl Free.

Summer reading programs

Reading is free AND educational, and most libraries have a ton of programs and story hours available for free — not to mention thousands of free books and movies available for hours of entertainment for both kids and parents.

You can also participate in these reading programs for fun incentives.

  • Pizza Hut’s Book-It Summer Reading Program offers prizes for kids in grades K-6 who meet summer reading goals.
  • Barnes and Noble is giving away free books to kids in grades 1-6 who read 8 books this summer.
  • My personal favorite bookstore Half Price Books has an awesome summer reading program — track 300 minutes of reading with your child each month in June and July, and submit your reading log to get $5 in gift certificates each month. All kids under age 14 are eligible, so you can even track minutes with a newborn and use the gift card to build your baby’s library!
  • The “1000 Books Before Kindergarten” program offers fun incentives through local libraries and an iPhone app that allows you to track your reading progress for your preschooler.

Many bookstores also offer free story hours if you’re looking for some air conditioned fun, so be sure to check their events calendars for more information.

Take a hike

Early mornings and evenings are a great time to get out into nature for a walk or a hike before it gets too hot. This hiking trail database lists trails by state to help you find a state park or recreational trail near you. The American Heart Association also has a handy tool for finding paved walking tracks if the great wilderness isn’t your thing.

Kids Eat Free deals

If you’re going out to eat, you might as well get a free meal for your kids. Money Saving Mom has a great master list of kids eat free deals updated regularly to help you find a deal for most weekdays.

What are you up to with your kids this summer? Share your ideas in the comments!

How much is convenience worth to you?

Dollar billsI am allergic to paying for shipping. At least that’s how it feels when I get to the checkout page for an item I want to buy online, see the shipping charge, and back out at the last minute.

Shipping feels like such a wasteful way to spend money to me. If I can purchase the item for the same or close to the same price in a store without paying extra for shipping, I will do it — even if it’s inconvenient for me.

But I know everyone doesn’t feel this way. You could make a pretty compelling argument that $7 is worth the convenience of having the items shipped right to your door. Kacie at Sense to Save has been experimenting with grocery delivery. So far she’s been able to get free shipping for her groceries, but I know there are people out there who would rather pay that fee to have groceries delivered to their doors rather than trudge out themselves. Obviously, grocery shopping is a much more labor-intensive endeavor than picking up a few things at a store, so I can see how this could be a fee worth paying. Grocery delivery isn’t available in my area, unfortunately, but there are weeks when paying an extra 10 bucks to save the time it takes to shop for food would be worth it to me.

There are two factors I consider when I decide whether it’s worth it to pay an upcharge for convenience — time saved and percent markup. For example, if I’m paying a $10 markup to have $100 worth of groceries delivered to my door, I’m paying an extra 10% to save 2 hours of time. Depending on what’s going on that week, it might be worth it to me.

But usually the shipping charges are a much higher percentage for less time saved. For instance, yesterday I was shopping a sale at a clothing store, and the shipping charge was $7 for my $25 order. That’s a 28% markup, and it would likely take me 15 minutes to pick up the items in the store since I knew exactly what I wanted. Even though it was inconvenient to head out with my 3-year-old and 2-month-old, I couldn’t bring myself to pay that $7 in shipping. It may “only” be $7, but if I spent $5-$10 on shipping every time I made a purchase, it would add up astronomically.

I will also pay more for merchandise than I planned just to avoid shipping charges. If I have to buy $50 of merchandise to get free shipping, but I only have $35 of items in my cart, I will add $15 more in merchandise to avoid the shipping charge. I’d rather pay $50 for merchandise than $42 for $35 in merchandise plus a $7 shipping charge.

The only time I pay shipping is if I can’t get the item in a store or the online price is so good that even if I pay shipping, the total cost is still less than I’d pay in store.

There are lots of other situations where I won’t pay a convenience fee. I paid my water bill in person every month for two years to avoid a $3 convenience fee (I live just a few blocks from my city’s utilities office). Thankfully, they finally began offering auto-debit with no fee, so I don’t have to remember to go to the office every month on the 15th. I will drive all the way across town to find an ATM that doesn’t charge a fee when I need cash. I never have pizza delivered and always opt to pick it up myself to avoid the $2 delivery charge plus tip to the driver.

How do you feel about paying for convenience? Is it worth the money to you?

Photo credit

Preparing for baby 2

I’m now 29 weeks pregnant, and officially into the third trimester. In the beginning of my pregnancy, everyone told me I would be amazed at how different pregnancy would be the second time. That hasn’t really been the case for me. I’m struggling with the same aches and pains, nausea, and extreme exhaustion (only this time, I’m anemic, too. Ugh.)

The only big difference for me this time? The time and energy I have to devote to preparing for baby. I wasn’t working for most of my pregnancy with Judah. For half of my pregnancy, Tony was in the process of job hunting, so he wasn’t working either, so I didn’t even really have to take care of myself! I napped, relaxed, and researched baby stuff on the Internet all day while Tony waited on me. Sigh. Those were the days.

This time, Tony is gone most of the day, and I’m doing the very physical (and exhausting) work of caring for our active, strong-willed 2-year-old. I’ve continued to teach part-time through most of the pregnancy, and I will do so (online) right up until the baby is born and beyond. I’ve been so busy, I haven’t really had time to think about nesting. There’s no chance I’m getting any cleaning or organizing done while Judah is awake, and I’m face planting on my bed within 10 minutes of his bedtime

Now that I’m in the third trimester, the urge to nest has hit me hard. I look around my house, and all I see are to-do lists. I have plenty of plans — but energy and time and motivation are still limited. I’m trying to be realistic about what I can get done.

Preschool is starting in early August for Judah, so I will have three mornings a week to catch up as long as my pregnancy continues to be free of complication (fingers crossed!). For now, I’m trying to prioritize what needs to get done.

Clothes

The great thing about a second child who is the same gender as the first with a relatively close birthday (Judah was born in late November; his brother is due in late September) is that we have a ton of clothes that will likely fit him. I saved everything that was in good shape. We won’t need to buy any clothes, but I do have to get the newborn and 0-3 months clothes out of storage, make sure they’re clean and ready to go, and revamp our clothing storage system. I want to replace Judah’s huge dresser with two smaller ones, stain treat and store the clothing Judah has outgrown (he still has winter stuff in his drawers — eep), and of course, stock baby brother’s drawers with hand-me-downs.

Sleeping Arrangements

arm's reach cosleeper
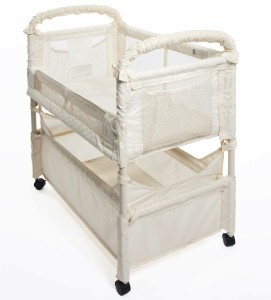
I will be using the same Arm’s Reach Co-Sleeper bassinet that Judah slept in for the first 6 months. Our house is a 3-bedroom, and I’d like to keep a guest room available for family for as long as possible, so I’m resisting the urge to turn our guest room into a full-blown nursery. That doesn’t mean I don’t have a lot to do in there. I will set up a crib, but I’ll probably just leave the guest bed in there, too, since baby won’t need the room all night for another 6 months. It’s been a while since we had visitors, so the room has become an embarrassing depository for old toys and things that don’t have another place. I need to clear it out, clean out the closet (which has served as random storage since we moved in), and make the room functional as both a place to store the baby things and a guest room. We also need to buy a new crib since Judah’s was manufactured before the crib regulations changed, and he pretty much destroyed it by chewing on it (teething rails are on my to-buy list this time).

Diapers

We’ll be cloth diapering for at least the first 12 months again. The beauty of cloth diapering is that pretty much everything can be reused. My diapers are clean and ready to go. I couldn’t resist buying some new covers when Cotton Babies had a seconds sale (50% off for diaper covers with minor imperfections!) So we’re hopefully all set. See this post for more information on my cloth diaper recommendations.

Car seat

britax b-safeThis is the biggest purchase we need to make, and I’m dragging my feet about it. I wasn’t sure if I wanted to get an infant seat carrier or skip straight to a convertible car seat. We had the Chicco KeyFit 30 infant seat for Judah, and I loved it, but it’s so pricey! I can’t reuse that seat because it was involved in a minor car accident, and the manufacturer says their seats are unsafe after any collision, so we’ll need a new seat for this baby. I also didn’t need the high weight limit, because Judah moved into the convertible at 9 months and well under 20 pounds. Even as small as he was, I didn’t use the seat as a carrier for longer than a few weeks, because the whole thing was just too heavy and I preferred my Baby K’Tan and later my Ergobaby carrier. Even in the winter, I just jumped in the backseat, secured him in the carrier, and wrapped us both up in my old maternity coat. It was so much easier than hauling that giant seat around.

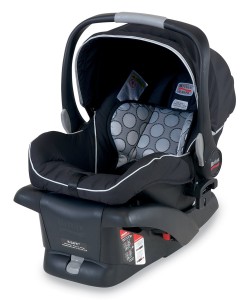
It sounds like I’m sold on the convertible, but even though newborns technically will fit in those giant seats, I just feel like the snug fit of the infant seat is a safer bet when they’re tiny. So I’m leaning toward getting a more affordable, no frills infant seat and upgrading to the fancy convertible I want when he’s 9-12 months. Unfortunately, I’m not thrilled with the bare bones safety and usability ratings on most of the economy infant seats, so I’m leaning toward a middle-of-the-pack seat with excellent safety ratings that’s short on extra features (the Britax B-Safe seat, which currently sells for about $135). It’s about $50 less expensive than the KeyFit with similar safety and ease-of-use ratings.

britax marathon 70 g3
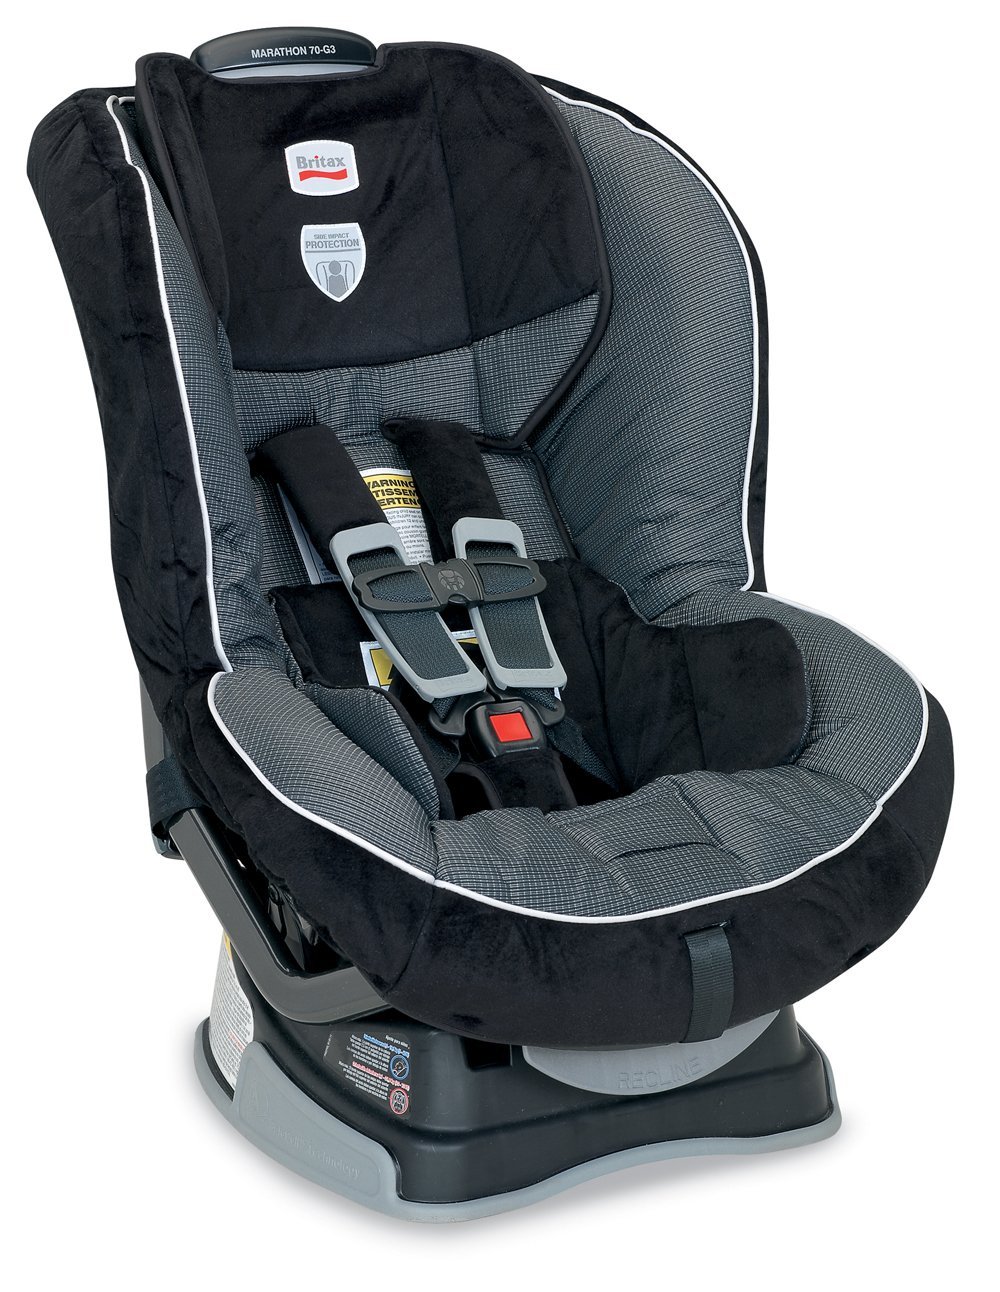
Eventually, I’ll move him into the Britax Marathon 70 G3. Judah has the Britax Roundabout 55, which is a great seat for the price, and I love it. My only big complaint is that the entire seat has to be uninstalled and the straps have to be completely removed to adjust them or wash the seat cover. This is a huge pain if you have a really messy kid (or one who gags and pukes a lot, ahem). The Marathon is similar with a few extra features and upgrades, and an easy-to-remove cover and no rethread harness adjustments. (Like the Roundabout, it will allow baby to rear-face up to 40 pounds, which is very important now that rear-facing is recommended to at least 2 years old! We just turned Judah forward-facing at 2 years and 8 months, and we plan on rear facing as long as possible with his brother, too.)

I’m also considering a few new purchases for items I used heavily with Judah that were given to me secondhand. Most notably, I’d like to replace the swing that was given to me by my sister. It’s a 5- or 6-yearold Graco Cradle n Swing that has been used by four babies including Judah. It’s powered by an AC adapter instead of millions of batteries, so replacing it won’t be cheap, but with so little to buy, I think it might be a good investment. Plus I’ll be able to resell it for a good price when the baby outgrows it.

Beyond that, I just need to clean, clean, clean and organize. I usually run a pretty tight ship when it comes to tidiness, but I’m a crappy housekeeper when I’m pregnant. A lot of clutter and messiness has built up over the past 7 months (almost a year if you include my last pregnancy and miscarriage recovery). Plus, our 1970s ranch is small with very little storage. It’s going to take some serious purging and Tetris-style reorganizing to fit a whole new person and all his stuff into this house.

How did you prepare for your second (or third or fourth) baby?

*All product links are Amazon Associates links, which means I earn a small commission if you purchase a product after following my link.

All photos courtesy of Amazon.com.

How to throw a toddler birthday party for cheap

I grew up with three sisters, and I was third born, so birthday parties weren’t a yearly deal for us. We each had a party or two to celebrate big milestones, but my mom didn’t throw a huge party for each of us every year — and I don’t blame her. I probably won’t either.

For Judah’s first birthday, we had a small party with cake and food for family only. This year, I’ve made friends with some families near us who have children around Judah’s age, so I wanted to have a fun kid party to celebrate what we’re hoping will be Judah’s last birthday as an only child. When I started researching party ideas, I was shocked at how expensive most party venues are. I would love to have a backyard barbecue, but that’s not really an option for November in Indiana, and I was afraid to let loose 10+ kids under 4 in my living room. By making a few compromises, we were able to celebrate Judah’s second birthday with all his friends without spending a fortune.

Throw a joint party.

I’m lucky to have a friend whose son is just 5 days older than Judah. It was her idea to combine their parties this year, and I’m so glad we did it that way. We share a lot of friends, so our guest lists would have had a lot of overlap anyway, and we were able to split the cost of the venue, food, and decorations between two families. At 2 years old, the boys didn’t mind sharing their parties a bit, and since we were both pretty laid back about the party, my friend and I didn’t have any trouble planning it together.

Plan ahead.

I was particularly proud of the goody bags, which included a 24-pack of crayons, a full-sized Play Doh, some Play Doh molds, fruit snacks, and a print out coloring sheet. The Sesame Street “Thank You” sign is an Internet printable that my friend found on Pinterest, and we used Zip lock bags to hold everything. I bought the crayons in bulk during the back-to-school sales for 50 cents a box, and my friend got the Play Doh in a Black Friday sale for under 50 cents each, so each bag cost us under $2. And of course splitting the costs between the two of us made them even less expensive. I was happy to hand out fun toys that the kids would actually use instead of cheap things that would be thrown away or lost before they even made it home.

For toddlers, all you really need is a lot of space.

We called the zoo, inflatable play places, museums — all of them wanted $300+ for a 2-3 hour party, not including food. Even though we were splitting the cost, that was just too much for a toddler party. Finally we found a fun play place that’s really just a giant open space with lots of toys where the kids can run around. It cost $100 for 15 kids and 2 hours of play.

Other cheap (or free) options we considered:

  • Many local libraries have conference rooms that can be rented out for cheap or even free.
  • Your home if you have the space for it and the energy/desire to clean before and after the party.
  • A park or your own backyard if weather permits.

As long as the kids have room to run around, you won’t need to plan activities or games. It’s hard to wrangle kids and keep their attention anyway, and you’ll kill yourself trying to plan things. Since we only had two hours, and our boys are too young to have any expectations for gifts, we also asked our guests not to worry about presents. This gave the kids more time to play and saved us the trouble of coordinating gift opening for two active toddlers.

Always buy less food than you think you’ll need.

RSVPs are notoriously inaccurate for kid parties. Kids get sick, they miss their naptimes, things happen. We ended up with about half as many kids and parents as we expected. Add to that the fact that the kids were too busy playing to eat much (Judah ate a single bite of pizza and threw a mega tantrum when we got home because we was starving, pfft). We ended up with about 8 whole pizzas to get rid of at the end of the party (we ordered 15). Keep all of this in mind when ordering, and try not to overdo it. In fact, for very young children, you’re probably better off serving just finger foods and cake and having the party between meal times (2-4 pm, for instance). Trying to get the kids to sit still and eat is almost impossible, and without a big meal there will be more time for play.

Make a cake.

Since the boys were sharing the party, I wanted them each to have a cake. I am hopeless when it comes to decorating, and anything I made would likely end up looking like those failed Cookie Monster cupcakes we’ve all seen on Pinterest. So I ordered a small cake from the grocery store for $15. My friend’s mom is a talented cake decorator who made this adorable Elmo cake for the price of the cake pan and ingredients. Surprisingly, most of the cake did get eaten, so I don’t regret our decision to serve two small cakes. I probably could have saved a ton by baking a simple cake and decorating it with toys he already has (the baker at the grocery store suggested cars or dinosaur figures).

What are your tips for frugal kid parties? I’d love to hear them in the comments.

Reusable vs. disposable — which is best?

Marketing companies have drawn a pretty clear line in the sand between disposable products and reusable ones. Disposable is synonymous with convenience, ease of use, and less work — but you pay a higher price for that convenience. Reusable products are better for your wallet and the environment, but harder work. Is this always the case, though? Like most things, I think it’s way more complicated. Depending on the product and your life circumstances, these rules often don’t apply.

Here are a few examples based on my experience.

Mop and bucket vs. disposable floor cleaning pads

For most of my life, I lived in places with wall-to-wall carpet and just a small space with hard flooring — the bathroom and kitchen. Filling a bucket with water and swabbing the deck the old fashioned way just didn’t seem worth the time with such small spaces. For years, I used a Swiffer wet jet and I was perfectly content with the results. Then I moved into a house with wall-to-wall laminate flooring and a small child. Suddenly, the Swiffer was a huge pain. It took several pads to get through all the floors in our house, and I never felt like they were clean enough.

I finally broke down and mopped the floors with an old fashioned reusable mop and bucket, and I was shocked to find that it was easier. The large mop head cleaned the floors much faster. I used vinegar and just a little Dawn dish soap, so cleaning solution cost next to nothing (and is healthier for my toddler than chemical-filled cleaning solutons). When I was finished, I tossed the cotton mop head into the washing machine in an old pillow case with a load of towels, and let it air dry. It was so simple, and so much cheaper. I’m kicking myself for not switching sooner.

Paper towels vs. reusable rags

I made the switch to reusable rags earlier this year, and I’m happy I did it. Paper towels cost a fortune, they aren’t very eco-friendly, and I’ve found that it’s easier and faster to clean most messes with a nice thick rag. Rags are a little fussy to wash — if you throw them into the hamper wet, they will mildew and stink. It’s also a good idea to put them through a hot wash with vinegar and a second wash with detergent to prevent stink problems. It’s been worth the trouble for me, though.

I do still keep paper towels on hand for some messes, though. I don’t like to use reusable rags or sponges to clean the counter or sink after handling raw meat, and paper towels are the best way to clean glass and mirrors without leaving streaks. Switching to rags 95% of the time has saved us a bundle, though, and reduced our footprint.

Plastics bags vs. reusable shopping bags

This one is a no-brainer for me. Reusable bags are affordable, carry more stuff, and are generally easier for me to carry. The only real downsides are remembering to bring them and keeping them clean (I do ask for a plastic bag to transport raw meat, and I wash my bags regularly). I occasionally request plastic bags for small purchases, because I like to stock pile them and use them as trash bags for the little trash cans in the bathrooms. I figure it’s better to reuse a plastic bag than buy plastic bags for that purpose. Aside from that, reusable bags are a clear winner.

Disposable toilet bowl cleaners vs. a toilet brush

Disposable toilet bowl cleaners are my guilty cleaning secret. The OCD germophobe in me can’t handle the reusable toilet brush. I never felt like I could get them clean, and then I couldn’t figure out how to let them dry without leaving them out in the open in the bathroom, so I’d stick them back in the stand wet and they’d start to mildew or mold and ugh. I can’t handle it. So I pay a small fortune for the convenience and sanitary bliss of replacing disposable toilet bowls cleaners. When I’m done, I pop the cleaning pad into the trash, sanitize the wand, and get on with my life. So worth it for me.

Disposable diapers vs. cloth diapers

This one was a toss-up for me. For the first year of Judah’s life, I absolutely loved my cloth diapers. They saved me money, are better for the environment, and I really didn’t feel like they were too much hassle. Just a couple extra loads of laundry every week. Then my son turned 1. We stopped breastfeeding shortly after his first birthday, and suddenly cloth diapers weren’t so easy anymore. I made the switch to disposables full-time, boxed up my cloth for the next baby, and I’m thankful I did it every time I change a poopy diaper.

So what do you think? When do you prefer disposable over reusable and vice versa?

Photo credit

Staying cool without air conditioning

Our air conditioner has been out since Thursday. While I’m a big believer that air conditioning is a luxury, not a necessity (the vast majority of people on the planet don’t have access to air conditioning, and many of them live in much warmer climates than the United States), I am honest about the fact that I love air conditioning. It’s my very favorite luxury there is, and I will sacrifice many other things in my budget to be able to afford it. So I’m not a happy camper right now.

Thankfully, the timing could have been worse. This weekend was the tail-end of a 10-day stretch of 100+ degree temperatures. We suffered through an uncomfortable night Thursday, and Friday after my morning class we hit the road to visit Tony’s family and take advantage of their air conditioning, because it was 104 degrees here on Friday and Saturday. When we arrived home last night, the temperature had dropped considerably thanks to some rain, so last night wasn’t too bad thanks to some fans, open windows, and a nice breeze.

It’s sticky and humid with an 87-degree high today, so while I’d prefer to keep the sticky humidity out of my house, at least we’re not baking in unsafe 100+ degree heat while we wait for the repairman.

We don’t know what it will cost to fix yet, but as you can imagine, air conditioning repair is in high demand right now. So the repair guy won’t be here until around 4:30 this afternoon. While we don’t have long to wait (hopefully), the experience made me feel even worse for the people around the country who suffered through this heat wave with no air conditioning or no power — not only did they not have air conditioning, they didn’t even have fans. Not to mention their refrigerators and freezers weren’t working, and in this heat, there’s pretty much no saving anything that requires refrigeration. My heart goes out to anyone who went through that ordeal.

I also realized that because I’ve been privileged enough to live in air conditioned homes my whole life, I have no idea how to go about keep a house cool without it. I did a little research last night to make sure that we’re as comfortable as possible today, and I wanted to share what I learned. It’s helpful information to have if your air conditioner ever stops working during a heat wave, and might even be a good way to save some money. If you can keep your house cool without air conditioning and only crank up the unit when the temperatures go way up, it would cut your summer cooling costs considerably.

Opening the windows isn’t always the best option.

This was the biggest lesson I learned in my research. When it’s hot, my first instinct is to open the windows. But we’ve noticed on warm days early in the cooling season when we’re resisting the urge to turn on the air, it’s actually cooler in the house when the windows are closed.

If it’s warmer outside that it is in your house, it’s actually better to close the windows to keep that hot air from getting inside. The best strategy is to open the windows after the sun sets and the temperatures cool, use fans to pump as much cool air as possible into the house in the evening and night, and then close the windows in the morning when the temperatures start to go up. That way you’ll hold the cool evening air in the house as long as possible.

Close the shades.

If you’re living without air conditioning, the best way to stay cool is to keep the sun from shining through your windows. You can do this by closing the shades, closing the curtains, or installing reflective film on the windows. All of these options are actually good ways to increase the efficiency of your air conditioner as well, so it’s a good idea to keep the shades closed on really hot days and install reflective film even if your air conditioner is working.

Maximize air flow through your house.

When your air conditioner is running, most experts agree that it’s smart to close the vents in rooms you don’t use and keep the door closed so you’re only using energy to cool the rooms you use most. When you’re counting on outside air to keep the house cool, the opposite is true. Open as many windows in as many rooms as possible and leave all the doors open to allow air to flow through the house. If windows are open on opposite sides of a room, it will create a nice cross breeze and cool things down even more.

Create a cross breeze using fans.

You can simulate the effects of a cross breeze by strategically placing fans on opposite sides of a room. Air feels much cooler when it’s moving, so you’ll be more comfortable in a warm room if the air is circulating.

Wear (and sit on) breathable fabric.

It’s common sense that when it’s hot, you should wear light, breathable fabrics like cotton, and dress minimally to keep cool. Also consider the fabric you’re sitting on. I noticed last night that I was much more comfortable on our cotton slipcovered sofa than I was when I sat in the microfiber recliner. If your couch or chairs are made of synthetic fibers like microsuede or a material that doesn’t breathe well like leather, cover them with a cotton sheet. Not only will you feel cooler while sitting on them, but it will also save your sofa from excessive sweat (yuck).

Turn off lights and appliances.

The last thing you want to do in a hot house is turn on the oven or the clothes dryer. Consider hanging laundry to dry if you must wash clothes during a heat wave. Lightbulbs also generate a surprising amount of heat. Keep as many of them off as possible during the day. It might be a little dark inside with the shades drawn and the lights off, but darker = cooler.

Be safe.

In extremely hot temperatures like the ones many people in the United States faced last week, people can become seriously ill or even die from heat exhaustion. If you don’t have an air conditioner, it isn’t working, or you lose your power during a heat wave, make sure you put safety first. Also make sure you and your family are properly hydrated in warm weather, and if it’s over 90 degrees in your house, it might be time to seek emergency shelter. Keep a close eye on children and senior citizens to make sure they’re handling the heat okay, and don’t be afraid to escape to a cooler place.

During extreme weather, most cities open cooling shelters in public buildings where people can escape the heat during the warmest part of the day. Head to a shelter, visit a friend’s air conditioned house, or even just spend the day browsing the air conditioned mall or another cool public place.

Photo credit

Shopping for new cookware? Consider stainless steel.

Tony and I have been married for four years (seriously? Only four?) In that time, we have bought three sets of nonstick cookware. Is it normal for cookware to last under two years? I don’t know. But as any cook will tell you, cheap cookware isn’t worth the cost of its excessive packaging, so replacing the good stuff every year and a half isn’t cheap.

Now before you send me all kinds of tips for how to extend the life of nonstick cookware, let me stop you right there. I cared for this stuff meticulously. Maybe not the first set so much, but the second two? Hand washed with mild detergent, metal utensils never touched it, nonstick safe sponges only, and I carefully stored each piece with a dishcloth in the bottom to keep them from scratching each other. Still, about a year and a half later, each pan started to chip, and I had to throw them away.

I’m not usually super paranoid about chemicals, but using chipped nonstick cookware is one area where I won’t negotiate. I don’t want to eat that stuff, and I certainly don’t want my baby eating it.

About a year ago, after our second set of cookware bit the dust, Tony and I started talking about how we could avoid replacing our cookware in another year. I looked up all kinds of tips for extending its life, and it turned out we were following all of them. We weren’t buying cheap cookware, so that wasn’t the problem. We came to a conclusion: we just don’t like nonstick cookware. It seems like no matter what we do, it doesn’t last long.

We decided it was time to invest in a set of stainless steel cookware. I was nervous. I envisioned stuck on messes that would take hours to scrub away and dinners scraped from the bottom of the pan, burned to bits.

My husband assured me that, as the primary cook in our house, he wasn’t intimidated by stainless steel. In fact, most of the chefs he admires recommend it over nonstick for most uses. Despite my nervousness, we ordered a set.

It’s been almost a year now, and we love our stainless cookware. Not only is it free of the crazy chemicals found in nonstick pans, but it’s surprisingly easier to clean — which I didn’t expect. I find myself scrubbing harder and longer on the nonstick pan we use occasionally, because I can only use those wimpy, nonstick safe sponges. If I’m scrubbing a stainless pan, I can use a steel scouring pad, and any gunk comes off much faster.

It’s also crazy durable. I love that we don’t have to worry about what kind of utensils we use with it, how we store it, how we clean it. A good set of stainless cookware can handle pretty much anything you throw at it.

If you’re going to take the leap, just make sure that you consider it an investment. It’s not necessary to get the top of the line, but you’ll get more mileage out of a good trustworthy brand like KitchenAid* or Calphalon* than you will from an off-brand. We went with the KitchenAid, because it’s very reasonably priced, and we’ve been happy with it.

As far as cooking goes, as long as you’re diligent about watching your stove as you cook (you should be anyway), refrain from turning up the heat too high, and use a nice oil when cooking things that stick (we like extra virgin olive oil), you’ll be fine. If you do burn something to the bottom of the pan? Just whip out your handy scouring pad, and with a little elbow grease, your pan will be good as new.

There are only a few things we cook that we don’t use the stainless. We have a nice nonstick pan that we use exclusively for scrambling or frying eggs. (My husband swears by keeping a special egg pan. He says it’s one of his secrets for perfect eggs, and I can’t argue with him, because the man can make a mean omelet.)

The other essential pan for your kitchen: a good cast iron skillet. We bought ours almost five years ago (for under $20, I believe), and it’s gotten better and better each year we use it. I’m told I’ll probably be able to pass that thing down to my grandchildren.

If you’re sick of replacing your nonstick cookware or wary of cooking with chemicals, give stainless a chance. I don’t think you’ll regret it.

*Affiliate link. If you choose to purchase an item using this link, I receive a small commission for recommending it to you.

Lifestyle inflation is no joke

I started my new teaching job at the beginning of March, but due to the pay schedule I didn’t receive my first paycheck until the first week of April. It’s been two years since the last time I had a regular paycheck of my own, and it was quite a thrill when the money showed up in our bank account. I felt that old “pay day” elation, and let me tell ya, it’s a powerful drug.

My plan for my income from the start has been to devote it entirely to beefing up our savings and paying down our student loan debt. Because I’m not sure how long I’ll be earning this money, it was never intended to be lumped into our regular income. But my bi-weekly paychecks are almost equal to the amount we’ve allotted to “day-to-day purchases” — groceries, household goods, and spending money. Suddenly, it felt like our “day-to-day money” had doubled.

Let’s just say, it’s been a pretty fun couple of weeks. I enrolled Judah in a summer gymnastics program, switched from my current gym membership to a more expensive YMCA membership (with a hefty enrollment fee), and did some damage in Target a few times.

Then I realized: this is how it happens. Your income increases, you tell yourself, “Just this once — we can afford it now.” And before you know it, your monthly budget has increased with no extra savings to show for it. It’s the very definition of lifestyle inflation.

Thankfully, I realized it before it’s too late. It still feels like “extra money,” so I have time to adjust the budget and reallocate the money before it becomes a serious habit. Only now it will feel a little like deprivation for the first few paychecks, because I already experienced the powerful drug of spending it.

I’m not saying that there’s no room to loosen up when your income increases. If you get a raise or find some other source of extra income, it’s okay to loosen up some areas of your budget. Just make sure you have a plan to put some of that money to good use, too. Save some money, repay some debt, increase your retirement contributions, and then spend a little. The point is that if you’re not mindful of how you spend income increases, you’ll get stuck in a cycle where you spend every penny you earn forever and ever. It’s a good way to feel broke no matter how much you make.

Don’t let this happen to you. Make a plan for your income increases before the money hits your bank account, and stick with it. Your future self will thank you for it.

Photo credit

Free & frugal ways to say ‘I love you’ on Valentine’s Day

This post was originally published on February 10, 2010. Happy Valentine’s Day!

I’ve never been a Valentine’s Day believer. I’ve always believed that you don’t need a special day to celebrate love. We should be celebrating every day, right?

It’s hard to avoid the Valentine’s Day hype, though, and any excuse to do a little something special for your partner is a good thing. You don’t have to spend a lot of money on flowers or jewelry, though. Try some of these free and frugal alternatives to celebrate the one you love today.

Do more than your share.

I would much rather come home to a spotless house than a dozen roses. This Valentine’s Day, show you care by doing your partner’s half of the household chores. Whether it’s bathroom duty, trash, cooking, dishes, or waking up early with the kids, your valentine will feel pampered if you give her a break for the weekend.

Share a small treat.

Early in our relationship, I assured Tony that I’d always prefer chocolate over flowers. Chocolate is dangerous for me, though, and I’d rather have a little treat than a huge box of candy. A little goes a long way, so surprise your valentine with a single serving of his or her favorite treat this weekend. It doesn’t have to be chocolates — maybe it’s trail mix or cupcakes. The important thing is that it’s his or her personal favorite. Bonus points if you bake it yourself (just make sure you bring the leftovers to the office or give them to your neighbors).

Write a love letter.

Love letters may seem cliche, but if you write something heartfelt and honest it will seem anything but. It costs absolutely nothing, but it means the world to the recipient.

Make a compromise.

Sentimental movies aren’t your thing, but your wife has been dying to see “Big Miracle.” Maybe you hate broccoli, but your boyfriend has wanted to try a new recipe for broccoli cheddar soup forever. It’s certainly not healthy to force yourself to do things you don’t like to do for your partner all the time, but you can make a compromise in the name of the most romantic day of the year.

Take a walk down memory lane.

Rent a movie that you saw in the beginning of your relationship. Make a mix tape of the songs you listened to on repeat for the first month you were dating. Do something that reminds you of how it felt when you first fell in love. Not only will it make you feel warm and fuzzy all over again, but it will serve as a reminder of why you fell in love in the first place.

I hope you all have a wonderful Valentine’s Day, and that whoever you share it with makes you feel very loved.

Photo by butterflysha