Happy holidays!

I didn’t mean to break for the holidays so soon, but I’ve been rushing around like a mad woman this week with last-minute Christmas preparations, and I just realized I haven’t had a chance to post at all. Doh.

I suppose now is as good a time as any to take an impromptu holiday break. I’ll be back after the New Year. In the meantime, enjoy a wonderful holiday with your families. Eat, drink, and be merry! And thank you for helping make this one of the best years of my life.

Fun holiday tradition: 12 days of Christmas

When I was a kid, I always looked forward to a fun tradition. For the twelve days leading up to Christmas, my mom would wrap small gifts for my sisters and me. Every day before school, there were gifts on the kitchen table for us to open.

The gifts started out extremely small — a pack of gum or a candy bar. As we got closer to Christmas, they would get a little fancier, but still small — the biggest gift on Christmas Eve would maybe be a CD or a DVD. The gifts were essentially stocking stuffers that we opened in the days leading up to Christmas instead of Christmas morning, but it was so much fun!

This year, Tony and I decided to do our own 12 days of Christmas. Every day until Christmas, we’re exchanging very small but thoughtful gifts. It’s a fun tradition, and a great way to show that we’re really paying attention to each other.

It’s not necessary to spend a lot of money or any money at all to show your kids or your spouse how much you love them through small gifts. I considered making a “pizza night” certificate for Tony. Since he does the cooking, I thought he’d like to have a pass to skip cooking and order pizza any night he wants. I ultimately decided that was sort of lame, since he already has that power anyway, but I thought it was a fun idea anyway. I also joked that he should give me a gift certificate for a free outing by myself while he keeps Judah at home. We’ll see if he takes my suggestion, but I doubt it since he said I can already do that whenever I want. (I’ll have to remember that from now on!)

I can’t reveal what I did get for him for the remaining days, but for days 1 and 2, he received a bag of M&Ms and a 6-pack of Coke in glass bottles — two of his favorite treats that he rarely indulges in. He gave me a mug for drinking tea or coffee and a package of Starbucks hot cocoa.

I apologize for not sharing this idea with you early enough that you could do your own version, but I literally decided to do it Monday, and we exchanged our first gifts Tuesday. So it was last minute for us, too.

Judah is too young to receive gifts like candy, and he really doesn’t need more toys. But I can’t wait until he’s a little older, and I can carry on this fun tradition for him.

What are your favorite holiday traditions?

Building a professional wardrobe on a budget

My exciting new teaching job starts in January (yay!). There’s a business-casual dress code, and unfortunately, all of the clothing I wore in my previous life as a professional was also worn in my previous life as a thinner woman who never had a baby (not yay). That means I’m in the market for an entire wardrobe of business-casual clothing.

I’ve never been that into clothing. I wear it to keep decent and warm, and I prefer to buy clothing that looks and feels good, but I don’t have a huge wardrobe. I like to keep a limited wardrobe with basic pieces that can be mixed, matched, and worn for years. I still wear clothes that I bought in college over 5 years ago.

Because I can think of a lot of things I’d rather spend money on than clothes, I’m trying to get creative about building this wardrobe. If you’re looking to build or refresh your wardrobe, here are some tips.

Lose the weight.

This was my first plan a year ago after Judah was born. I have several nice pairs of pants that are about a size too small. I even have a few pieces that are TWO sizes too small from my really skinny newlywed phase (it was short but fabulous). If I could shed the final 20 pounds I gained during pregnancy, I would double my professional attire wardrobe. Sadly, the chances of me losing that much weight in the next three weeks in the middle of the holiday season are slim (no pun intended). So it’s on to plan B.

Assess what you already have.

Many of the sweaters, blouses, and tops I have from before pregnancy still fit reasonably well. I also have a lot of pieces that I wear in casual settings, but they can easily be dressed up with nice slacks or a cardigan. Thanks to those pieces, I’m really only in the market for pants and maybe a few new pieces for layering.

Check the thrift stores.

Because of the nature of dressy clothing (many people own slacks or blouses that they only wear a couple times a year), it’s possible to find really nice dress clothes in excellent condition for unbelievably low prices at thrift stores. I’ve never had much luck with clothing at thrift stores, but I’ll definitely give it a shot.

Never pay retail.

When you see a really flattering top or pair of pants at full price, it can be tempting to buy it if really like it. Don’t do it! I worked in retail, and I can tell you, the turnover for stock at clothing stores is incredibly fast. What’s new and full price today will be marked down to clearance in a matter of weeks. Wait it out and keep a close eye on certain styles. Come the end of the season, that full-price item will be marked down at a fraction of the price. Even if your size is sold out in store, you can usually shop online for more sizes and colors.

Buy basic pieces that can be mixed and matched.

It’s not the most exciting way to build a wardrobe, but it keeps costs down and simplifies things tremendously. Most of my clothing is in dark colors that coordinate (black, grey, dark blue, brown). Every top I own can be worn with either black or khaki pants, which makes it easy to shop for new pieces that coordinate well with pieces I already have. Choose a color palette that suits you, and then look for clothing that will easily coordinate in several different configurations.

What tips do you have for building a professional wardrobe without spending a fortune?

Photo credit

Easy weeknight roasted chicken and potatoes

Most people think of roasted chicken as a fancy Sunday dinner. The truth is, it’s so simple that you can easily make it on a busy weeknight. The price averages 89 cents a pound at my grocery store, which makes it a pretty frugal meal, too, since we always have leftover dark meat to use in other meals like quesadilas or chicken enchilada soup.

It’s not a quick meal compared to other “quick-fix” recipes — it usually takes about an hour to roast a 5-pound chicken at 400 degrees. But it’s very hands-off. Prep the chicken, and the oven does the work for you.

Here’s Tony’s no-fuss method for roasting chicken with a bonus side dish recipe for roasted rosemary potatoes.

Easy roasted chicken

  • 5-8 pound whole chicken
  • Kosher salt
  • Fresh ground black pepper
  • Dried rosemary
  • Dried thyme
  • Extra virgin olive oil

Rinse and thoroughly dry the chicken. Place chicken with breast-side up in a roasting pan or cast-iron skillet (we prefer the cast-iron skillet, because it makes cleanup easier). Coat chicken with olive oil. Cover with salt, pepper, rosemary, and thyme. Roast at 400 degrees for about an hour or until internal temperature of thigh meat is 165 degrees and juices run clear.

If you’ve never carved a whole bird before, this video will provide you with far better instructions than I could give you.

Roasted rosemary potatoes

  • 1 pound potatoes
  • Extra virgin olive oil
  • Kosher salt
  • Black pepper
  • Dried thyme
  • Dried rosemary

For this recipe, I prefer to use thin-skinned potatoes like yellow or red potatoes, because they don’t require peeling. This makes things much easier and quicker.

Wash potatoes, and chop into large bite-sized pieces for faster cooking. Spread potatoes in one layer on a baking sheet. Coat with olive oil, salt, pepper, rosemary, and thyme. Roast in 400-degree oven for 25 minutes, turning potatoes halfway through cooking.

If you’ve never roasted a whole chicken, you MUST try it. It is so simple and delicious. It’s one of our favorite go-to meals, and there’s always enough meat left over for at least one more meal later in the week. Plus you can reserve the carcass for homemade chicken stock.

Homegrown dried herbs

My first garden was sort of hit or miss. The herbs grew beautifully, and I harvested quite a few cucumbers before the plant succumbed to wilt. The red peppers were too shaded by the gigantic tomato plant to ever do much of anything. And that tomato plant? Pfft. It grew probably about 20 GIANT tomatoes that never turned red. I think it was a combination of planting too late and putting too much into one tiny bed.

I was feeling guilty about my beautiful herbs, though, because I didn’t think I’d used enough. As the first frost neared, I wanted to try to salvage some of them for drying so I could get a little more use out of them. I was really intimidated by the idea of drying herbs myself. My favorite Food Network chef, Alton Brown, did an entire show on the practice of drying herbs, but his method was so complicated and required buying lots of equipment. I didn’t have time for that. So I decided to do it the old-fashioned way and hope for the best.

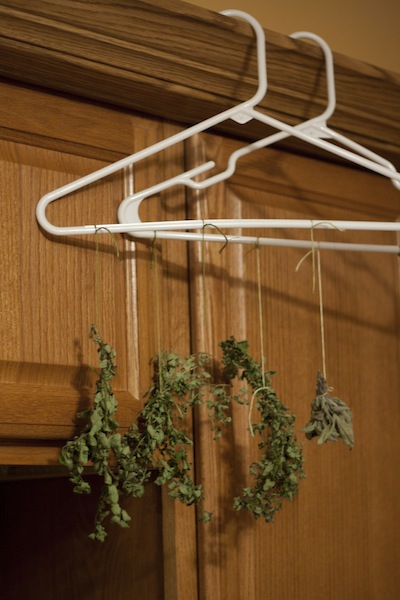
I clipped as many stems as I could from each plant. Then I bundled them up and tied them with something I had laying around — embroidery floss. It took some thinking to find a way to hang them, but I eventually tied the bundles to a couple of ordinary hangers. I hung them in a dry, dark place in my house, and I left them alone.

About two weeks later, I cut them off the strings, removed the stems, crushed them into tiny flakes, and put them into clean, dry baby food jars that I reserved specifically for this purpose. I used office labels to mark each jar. Unfortunately, my gorgeous basil plant didn’t survive long enough for me to clip any for drying, but I have rosemary, oregano, peppermint, sage, and a little bit of parsley.

It was so simple! My only regret is that I didn’t clip more stems. I thought I’d end up with too many, but once they’re dried, removed from the stems, and crushed, they take up much less space than when they’re fresh. There’s not really enough parsley to do anything but garnish a few dishes, but I have a ton of rosemary and oregano and a little sage for our holiday cooking this year.

I will most definitely be doing this again next year with my late herb harvest. These dried herbs are much cheaper and fresher than the freeze-dried jars at the grocery store, and looking at these tiny jars of fresh dried herbs makes me feel so proud of my tiny little garden.

Short break

I’m taking a break from blogging and the Internet in general this week as we enjoy a holiday vacation. I’ll be back next week. I hope all of you have a wonderful Thanksgiving. We’ll be celebrating the many blessings this year has brought us.

Thanksgiving menu with recipes

One of the perks of having families on separate sides of the state is that we don’t have to try to cram two dinners into one day on Thanksgiving. Last year, we hosted Tony’s family for a meal the week before Thanksgiving, and we celebrated with my family on Thanksgiving day. This year, it’s reversed. Either way, we’re having Thanksgiving two weeks in a row! It works out, because Thanksgiving is pretty much my favorite holiday.

Tony makes a pretty incredible Thanksgiving dinner, and we’ve gathered these recipes from various sources since we met and started celebrating Thanksgiving together. We’ve always cooked our own meal on another day, even on the days when we celebrated Thanksgiving day with our families. The turkey, gravy, and pie are new recipes that we’ve never tried. I’ll let you know how they turn out, but I’m sure it will be marvelous.

What are your favorite Thanksgiving recipes?

Photo credit

The most unpleasant topic in personal finance

I am embarrassed to admit that our son is almost a year old, and we’ve put this off until now, but right now we’ve begun the process of reevaluating our life insurance needs and writing our wills. Ugh, it’s the worst.

The truth is, applying for life insurance is a complicated process, and every time I sit down to actually do it, I start feeling overwhelmed and I hate the feeling I get in my stomach when I think about a situation where we’d actually need this life insurance and I decide to put it off for a little longer. I realize this isn’t a grown up way to handle the subject, but I imagine I’m not the only grown up who feels this way, so I’m admitting it now. If you’re feeling this way, too, I’ll tell you what I told myself: it’s better to get it over with, and then forget about it and hope that you never need it.

So. The big question: How much insurance do we need? For Tony, we’ll need a considerably higher amount of insurance since he is the primary earner. Tony already has a policy provided by his employer that equals two years’ salary. That’s certainly a start, and if we didn’t own a home or have a child, it would probably be enough for us. But in the event of the unthinkable, we want to pay off the mortgage, pay our remaining student loan debt, and provide enough income for me that I can continue to stay home with Judah and any future children until they’re teenagers.

For me, our needs are less. We’d basically want to pay off the house and remaining debt in the event of my untimely demise. We’ve chosen not to include education needs for children in our life insurance estimates at this time. We really just want to cover immediate needs. We may choose to increase our coverage later, but for now we think our money is better spent on accumulating savings and paying off debt rather than paying a high premium for a million-dollar life insurance policy.

Unfortunately, Tony has a pretty extensive family history of cancer, heart disease, and diabetes. I have heart disease in my family tree, too. So our premiums may be higher than people without these family histories.

This calculator from the nonprofit LIFE Foundation is a handy way to calculate your life insurance needs from an unbiased source. Insurance salespeople earn commission on most policies, so you might want to determine your needs before talking with a sales agent.

I’m contacting a few sales agents this week for quotes, and I’m going to determine what we need to do to get the ball rolling. I’m assuming the most annoying part of the process will be medical exams to determine our current health.

As for our wills, our needs are very simple. Since we don’t have a lot of assets at this point in our lives — mostly just a relatively small amount of cash savings, two tiny retirement accounts, and a house with a big old mortgage — our most pressing concern in writing a will is who will take care of Judah if both of us were to die.

I’m looking into alternatives to hiring an attorney right now. A service like LegalZoom may be sufficient for us at this time since our will is going to be simple. I’d appreciate any experiences you can share about that service as I determine if it makes sense to go the super budget route or pay a couple hundred to an attorney.

I’m not going to lie, I feel a little sick just thinking about this stuff, but grown ups have to think about yucky stuff sometimes, so I’m sucking it up. I sure hope we never need to use ’em.

Photo credit

Lasagna with old-fashioned marinara sauce

This is one of the only recipes that I prefer to cook instead of Tony. The recipe came from my mom. It was my favorite meal when I was a kid, and it’s one of the first things I ever learned to cook, so I have a lot of fun making it myself.

It’s not difficult, but it’s time consuming and a lot of work, so I usually only make it for special occasions or dinner guests. It’s worth the work, though! It’s still one of my favorite meals.

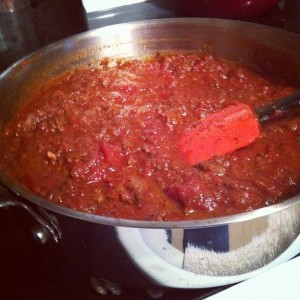
The marinara sauce is delicious on its own, and you can use it for ordinary spaghetti or other pasta dishes. I hope you enjoy it as much as I do!

Lasagna with old-fashioned marinara sauce

Classic Marinara Sauce

  • 1 lb. ground beef
  • 1 small onion, chopped
  • 3 cloves of garlic, minced
  • 1 (14.5-oz) can of diced tomatoes
  • 1 (14.5-oz) can of tomato sauce
  • 1 (5- to 6-oz) can of tomato paste
  • 2 Tbsp. of parsley
  • ¼ tsp. of sugar
  • ¼ tsp. of kosher salt
  • 1 tsp. of dried basil
  • ½ cup of red wine

Cheese Filling

  • 3 cups of ricotta cheese
  • ½ cup of Parmesan cheese
  • 1 Tbsp. of parsley
  • 1 tsp. of oregano
  • 1lb. lasagna noodles
  • 8 oz. shredded mozzarella cheese
  • 1/2 cup Parmesan cheese for sprinkling

Cook ground beef in a large skillet with a pinch of salt and pepper until browned. Drain all but a tablespoon of the fat. Add onion and garlic and saute in skillet with ground beef until soft. Add diced tomatoes, tomato sauce, tomato paste, parsley, salt, and basil. Stir until tomato paste is blended into sauce. Bring to a slight boil. Add red wine. Reduce heat, and simmer for 30 minutes.

In a large bowl, combine ricotta cheese, Parmesan cheese, parsley, and oregano. Boil lasagna noodles for 10-15 minutes according to instructions on packaging.

Build lasagna in a deep casserole dish beginning with a small layer of sauce to avoid sticking. Lay down noodles with no gaps followed by cheese filling, sauce, mozzarella cheese, and Parmesan cheese. Repeat twice for a total of three layers. Top with a layer of sauce, mozzarella cheese, and Parmesan cheese.

Bake at 350 degrees for 30-45 minutes until cheese is bubbly and beginning to brown. Allow to cool for 15 minutes before serving.